Intro to Computer Engineering
Studio 5 - Digital Inputs and More Practice with Delta Timing

Introduction
Click here to access the Canvas page with the repository for this studio.
Objectives
By the end of this studio, you should know:
- how to read digital inputs,
- how to debounce a mechanical push-button switch,
- more about delta timing
Push-button inputs
The first thing we’ll do today is explore push-button inputs in more detail. This includes investigating the bouncing properties of the buttons themselves.
Mirror
Complete the sketch called mirror so that it reads the state of the push-button input and sends it to an LED digital output (i.e., flash an LED on when the button is pressed). The program should repeat this operation continuously.
Extend this program to count the number of times the push-button has been pressed. For example, if the button is pressed and released three times it should count to three. You can detect a press either as the input changes from 0 to 1 or as it changes from 1 to 0. Each time the count increases, display the current value of the count in the Serial Monitor.
Does the count always accurately reflect the number of times the button has been pressed?
Debounce
Complete the sketch called debounce so that it reads the state of the push-button using a proper debouncing technique, like the one covered in this tutorial from Arduino. (This example uses an external resistor as a pull-down. We have been using an internal pull-up, which requires different logic!) In your opinion, does the tutorial use proper delta-time techniques?
Check that your push-button is appropriately debounced by repeating the counting experiment above. What debounce delay is necessary for your push-button to be reliably debounced?
Handling More Traffic
The rest of his module’s studio will be a continuation of the Stoplight Delta Timing Studio from Module 3. Replace the stub stoplight.ino with yours from Module 3. Then wire your Arduino to once again have the red, yellow, and green traffic lights, the “walk” light, and the “don’t walk” light as in Module 3’s Studio.
Now update your sketch to include a two-way intersection, like:
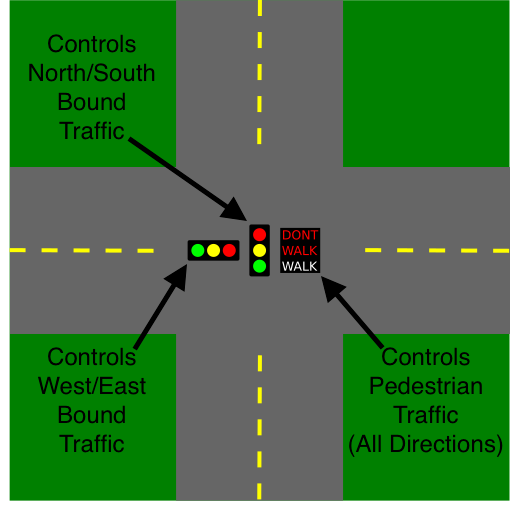
It should fairly switch between:
- Allowing traffic to go north/south
- Allowing traffic to go east/west
- Stopping all traffic and allowing pedestrians to cross in either direction
You will need to:
- Add three more LEDs
- Create a new state machine diagram with appropriate states
- Update your code to reflect the new diagram
How many states did you include in your new FSM? Draw the FSM you have designed on the FSM designer.
Studio Demo 2
The full, two-way stop light with a crossing should work something like this (Again, WALK is Blue, but this time DONT WALK is Yellow):
Finish up
- Commit your code and verify in your web browser that it is all there.
- Get checked out by a TA.
Things that should be present in your repo structure:
debounce/debounce.ino
mirror/mirror.ino
stoplight/stoplight.ino
Key Concepts
- Delta timing
- Maintaining east/west traffic light
- Maintaining north/south traffic light
- Maintaining walk light and blinking don’t walk light
- FSMs
- Transitioning from one state to another
Generated at 2026-06-06 01:31:31 +0000.
Page written by Ben Stolovitz and Shuya Ma; Revisions by Bill Siever, Roger Chamberlain, James Orr.